Help With HTML
How to insert images in your story.
Using basic html tags is not difficult at all. Here I am going to show you a few tags that will get you throught a simple story
where you can use various front attributes to make your text different sizes, bold or underlined, in color, highlighted, etc....
A tag is just a snippet of code that tells the browser what to do. They are always inside a less than & greater than sign. < >
The tags are not visible in your text, only the browser sees the tags and follows the commands within the tags.
Some tags just make a line break, like the <br> tag, anything after the <br> goes on the next line down.
If you add another <br> then you get a line feed (a blank line).<br>
<br>
Others specify font face, size, and color like: < font face='arial' size='4' color='#ff0033'>
This text is bigger and red
to stop this font attribute (you may not want all of your text in red) you use a "End font" tag </font>
You can use font sizes from 1 to 7.
This is size 1
This is size 2
This is size 3
This is size 4
This is size 5
This is size 6
This is size 7
You can do just one attribute ii you want or combine several attributes as shown above
by doing <font size='4'> all your text after this tag will be size 4 until you stop with the "end font" tag </font>
You can also use a "Header" tag to make a big, bold header as: <h1> This is a header</h1>
<h1>This is a header (h1) </h1>
It ends like all tags with a </h1>. Headers come in 6 sizes, 1 to 6. 1 being the biggest. Headers also make line spacing above and below the header
h1
h2
h3
h4
h5
h6
The <b> tag for example will make any character after it, bold. To end the bold attribute you use </b>
as: <b> this part is bold </b>this part is not.
Another useful tag is the center tag. If you want to center text or images on he page then use this tag. Use the end tag to stop the center command
if you don't -or forget to- use the end tag, everyting in your page will be centered.
Also if you are using the p class tag you woud End it and set attributes for your
centered text using the font tag and then do a p class tag for the text following the centered text
<center>
This text is centered on the page </center>
We have 2 preset paragraph attributes set for your story.
These are: <p class=story> and <p class=plain> followed by </p> which ends the paragraph.
The <p class=story> will set your story in black text, 26 pixels high and justified as you see in this page
<p class=plain>
will set your story in black text, 18 pixels high and left aligned like this line.
With either p class: story or plain the </p> tag will end the font style of that paragraph wherever you put it.
For simplicity, you can start with a <p class=story> tag and just use <br> tag at the end of each paragraph,
& as a blank line between paragraph. Then put the </p> tag at the end of the story.
If you plan on changing font style anywhere in your story; like a different size or color, or using the center tag <center>
or inserting pictures: you must end the paragraph with a </p> tag .
Then specify the new font style, and write the text for the new style, and end the font style with </font>
or insert your picture(s) and then resume your story with a new <p class=story> tag.
You can start new paragraph with a p class tag, <p class=story> or <p class=plain> or you can just type without
any p class tags, and just specify the font style that you want like this:
<font face='arial' size='3' color='blue'>
my text with this "blue" font tag </font>
Alternatively, you can omit the p class tag and have the default browser text. In this case use the <br>
tag to break a line or to skip as many lines as you want.
<br>
<br>
<br>
<p class=plain>
Here is text with the "plain" p class tag. As you can see it is just plain text, but you can use the font tag < font face=' '>to change any part of your text
to a different font face, color or size. You can also use the <b> bold, or the <h> tag or any other tags in your plain text. When using the
font tag dont forget to use single quotes to enclose each attribute like face ='arial' color='#00025E' (you can also use color names like blue, red, green... and size='3')
Using the color codes as shown below, will give you a more precise color than a color names.
Here is a link to a color chart so you can get all the color codes or color names that your can use in your story.
Click here for the Color Chart
Inserting images or .PDF files in your story
The only other thing that needs a mention is the links for your images or for PDF documents you may want to
include in your story. There are two ways to insert pictures within your story. First, you must upload the
pictures that you intend to use. You can upload up to 10 files; images or .PDF files.
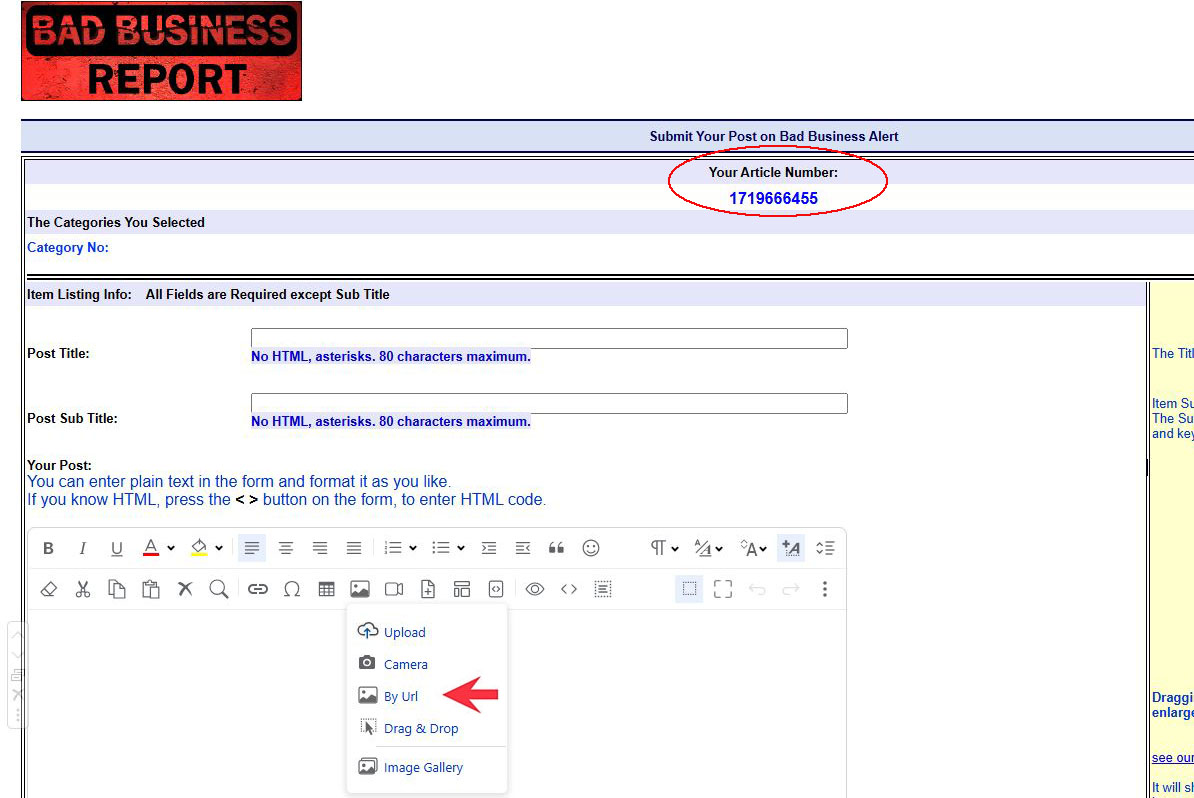

1) If you are not entering HTML code, you can use inpu text in the listing form & format it just like you would
in Microsoft Word. To insert a picture, click on the Photo button and click on the " BY URL" option.
In the pop up box you enter the link below, using the name of the image you wish to insert, and replace
"article number" with the number at the top of the form. You can move it around and place it wherever you want.
https://badbusinessreport.com/stories/article number/my-image.jpg
2) You can enter your own HTML code to insert pictures as explained below.
When you are on the Listing Form page, you will see an "Article Number" at the top of the
form. That number is the name of the directory where all your photos are be stored. See the samples below.
for images use this format:
<img src="http://badbusinessreport.com/stories/article number/name_of_my_image.jpg" width="600" height=" " >
It's important to use the width or height in picture tags. If you dont your picture will show full size, which may be huge.
If the picture is landscape, use a width of 400 to 800 and leave the height blank. Vice versa, if it's Portrait, use the height attribute
and leave the width blank.
for documents, convert them to an acrobat PDF file and use the following tag
<a href="http://badbusinessreport.com/stories/article number/name_of_document.pdf" >my.Pdf</a>
You could also copy this link and change the "name_of_document.pdf" to the name of your .pdf
Link Text (which is the text you click on to see the document) can be anything you want.
ie: Click to see the actual document
You can upload a combination of up to 10 image file or PDF files. If you need to upload more, email them to us.
We'll put them in your directory. You can include your image tags in your documents in the interim.
Send us the images and documents via email, make sure to include your post number and the title of the post, so we can
upload them into your folder. Images will show up in your documents as soon as we upload them.
To display an image from another site, use the format below:
<img src="http://another site.com/name_of_image.jpg" width=" " height=" ">
To link a PDF documents, use a link format:
<a href="yoursite.com/name_of pdf_file.pdf" > See my xyz.pdf file here </a >
Well, that should be of help if you care to write your own simplified code to enhance your story.
if you need to get "Fancy" you can google "html tags" and learn so much more. You can also google "CSS styles"
and learn more about "in line style" but then that will be way fancier than you really need to post a simple story.
If you are posting a single picture between paragraph, use the picture code below (just copy & paste the link but change the picture or file name to yours)
be sure to use a couple of br tags before and after your images. it would look like this:
<br>
<br>
<center>
<img src="http://badbusinessreport.com/stories/article number/name_of_image.jpg" width="400" height=" " > <br>
</center>
<br>
<br>
If you need to use 2 or more pictures between paragraphs, use this format
<br>
<br>
<center>
<img src='http://badbusinessreport.com/stories/article number/name_of_image_1.jpg' width="400" height=" ">
<img src='http://badbusinessreport.com/stories/images/space.jpg'>
<img src="http://badbusinessreport.com/stories/article number/name_of_image_2.jpg" width="400" height=" ">
</center>
<br>
<br>
The "space.jpg" is just a white space image to provide space between 2 images side by side. If you plan on doing four or more pictures,
just do another section like the one above. For simplicity, just copy & paste this code, but change the image names to your image file names.
this would look like this:
<br>
<br>
<center>
<img src='http://badbusinessreport.com/stories/article number/name_of_image_1.jpg' width="400" height=" ">
<img src='http://badbusinessreport.com/stories/images/space.jpg'>
<img src="http://badbusinessreport.com/stories/article number/name_of_image_2.jpg" width="400" height=" ">
<br>
<img src='http://badbusinessreport.com/stories/article number/name_of_image_3.jpg' width="400" height=" ">
<img src='http://badbusinessreport.com/stories/images/space.jpg'>
<img src="http://badbusinessreport.com/stories/article number/name_of_image_4.jpg" width="400" height=" ">
</center>
<br>
<br>
Don't Worry!
We are alerted of every post, and view them to be sure they meet our guidelines. If we see that your post needs a little
formatting assistance, we will take care of it. Again, if you need to make corrections (without changing the context of
the story) simply click on the "Revise" link at the bottom of your story. The link is good for 7 days only.
If you're having difficulties using the HTML editor, you can simply format your story in a word procesor like Microsoft Word, and save it as HTML.
You can then just copy the Word HTML file and paste it in the dialog box when posting your story.
You can also send it to us at admin@badbusinessreport.com and we will post it for you. Include
your User ID & Password with the story.
|